Continuous Deployment is the act of automatically deploying an application every time the build is successful. I am currently working with a development team that is working towards continuous deployment as part of their continuous delivery adoption plans. The system involves several internal web services which seemed like a good place to start working on not only automating the deployments but maintaining a very high degree of up-time during those deployments. Automating deployments involves both development and techops groups so I thought I would search for some worked examples that would help illustrate the techniques and steps required. I found several blogs and articles talking about different approaches but no worked examples.
This article steps through the process but also includes a complete worked example.
For the impatient the source code and rake script for this example can be found at https://github.com/grahambrooks/zero-down
If you have worked with Rails or Play framework then you will know about database migrations (evolutions in Play). Each migration changes the database schema including the migration of data. These systems are pretty powerful and have significantly improved the reliability and speed with which web applications can be updated.
But there is a catch. The upgrade process assumes that there is a service outage or that there is a data gap between the old system and the new.
Service outages are the traditional approach where the old system is turned off or made inaccessible by clients while the database and applications are updated. Typically these updates are done when the system is lightly loaded to minimize business impact.
To avoid this some implementation use blue/green deployment slices but this can lead to data discrepancies between versions that need to be resolved after the upgrade. Blue/green updates have the advantage that active users are minimally disrupted (if at all). For 24/7 operations this approach is very attractive.
Updates that minimize or eliminate service disruption should be the norm so the techniques covered here focus on maintaining service.
Martin Fowler has a good introduction to the blue green release process on his site Martin Fowler Blue Green Deployment
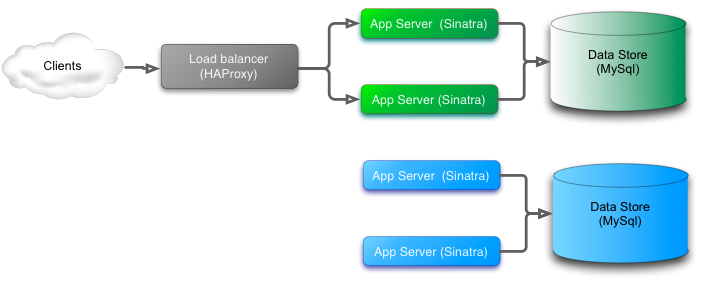
Blue/Green releases
Initial Green state
Starting out we have the green system clients call a web service through a load balancer. The web service is backed by a relational database. A fairly typical setup.

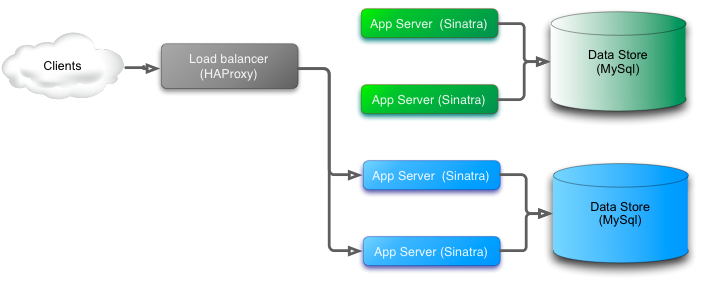
Next we add the new ‘blue’ system which is a complete stack of system components including the app server and database.
Adding new blue slice
The switch over is quite simple. At a convenient point in-bound traffic is switched from the green system to the new blue version. For the blue system to be brought up and running a copy of the green database is taken and then upgraded using the database migrations for the new blue version. Any transactions processed by the green system while the blue system is being upgrade and made ready for the cut over need to be re-played to avoid data loss. Until the data is moved user data sent to the green system will not be available in the new blue system which can easily lead to discrepancies that are very difficult to unwind and resolve in transactional systems.
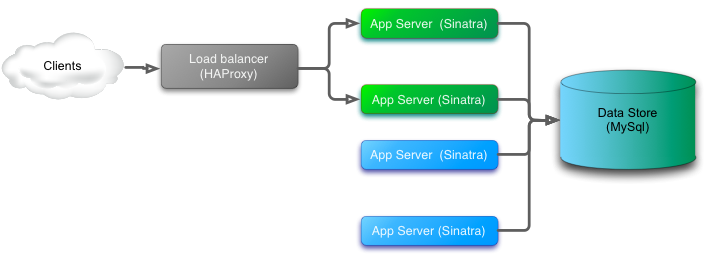
Switching green for blue
Finally the green system is removed.
Final blue state

This option creates a new database and service instance using the new release and then migrates callers from the old version to the new. Typically this is done by updating load balancer configuration.
This option requires that requests to either version are processed successfully into the database otherwise transitions to the original system will not be available after the transition.
If workable this option is lower risk. On upgrade failure traffic immediately falls back to the original system until a fixed version is available.
Backward and Forward compatible database
This approach has a few more steps and needs more code that is later thrown away but it solves the key problem of data integrity during and after the upgrade.
Assuming we start in the same state with an active green system the first step is to apply database updates. These updates need to support both the current system and the new version. Quite a few database changes can support both versions but simple restructuring the database schema are problematic and need additional measures.
Adding blue system and blue/green database
Now when we switch over there is no data discrepancy. Database updates apply to both systems and data integrity can be maintained.
Switching over

Once traffic is being served from the new blue system any code in the database to support the old green system can be removed.
Final blue state
Worked Example
This example is not a full blown app but contains all the key elements for zero down-time updates.
UML of the initial ‘green’ database schema
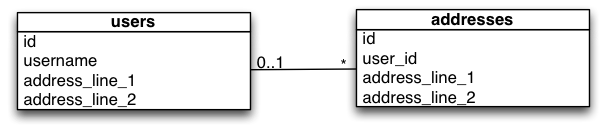
UML of the transitional or interim ‘blue-green’ database schema
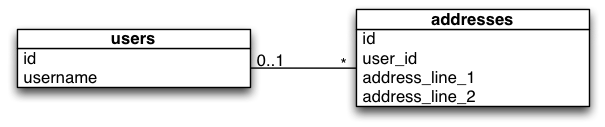
UML of the final ‘blue’ database schema
Back to front updates
This approach updates the database first and then each of the application servers. For this approach to work the database has to be compatible with both the current version and the new version of the service.
Naturally this approach has more risk. If the database update fails or is not compatible the release is blocked.
Tech
- Persistence - MySQL
- Application - Ruby Sinatra app using active record
- Load Balancer - HAProxy
Development tools
- Rake for automating the deployment tasks
- dbdeploy for database migrations
The app is extremely simple. It serves a single index page showing a list of users. Version 1 shows a single address stored in user table. Version 2 shows each user with zero or more addresses.
Update basic flow
Initial State
- Server version 1 is running on port 8001
- HAProxy is configured to accept in-bound connections on port 8000 and passes them on to the application on port 8001
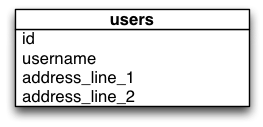
- Database contains a single table
CREATE TABLE users (
        id int(11) NOT NULL AUTO_INCREMENT,
	username VARCHAR(20) NOT NULL,
	address_line_1 VARCHAR(100),
      	address_line_2 VARCHAR(100),
	PRIMARY KEY (id)
);
Target State
- Server version 2 running on port 8002 (in real life this is likely to be a different server)
- HAProxy accepting in-bound connections on port 8000 and forwarding request to version 2 on 8002
- Database contains two tables (users and addresses)
Upgrade steps
- Create the new table (addresses)
- Setup triggers to create, update and delete address records when a user record is updated
- Copy the address data from the users table to the addresses table
- Run Server V2
- Update the load balancer configuration (HAProxy) to point to Server V2
- Shutdown Server V1
- Remove the database triggers
- Remove the unused columns from the users table
Setting up Version 1
Create the Database
CREATE DATABASE rolling;Set up the required table for dbdeploy
CREATE TABLE changelog (
  change_number BIGINT NOT NULL,
  complete_dt TIMESTAMP NOT NULL,
  applied_by VARCHAR(100) NOT NULL,
  description VARCHAR(500) NOT NULL
);

ALTER TABLE changelog ADD CONSTRAINT Pkchangelog PRIMARY KEY (change_number)
;
Run the first migration
CREATE TABLE users (
        id int(11) NOT NULL AUTO_INCREMENT,
	username VARCHAR(20) NOT NULL,
	address_line_1 VARCHAR(100),
      	address_line_2 VARCHAR(100),
	PRIMARY KEY (id)
);
Start the server
ruby server/v1/server.rb -p 8001
Start HAProxy with Version 1 configuration
haproxy -f cfg/v1/haproxy.cfg -D -p $(<haproxy-private.pid) -st $(<haproxy-private.pid)
At this point the service is available at: http://localhost:8000 and the server endpoint at http://localhost:8001
Setting up to install version 2
First we need to set up the new table structure and the mechanism for maintaining backward and forward compatibility in the database. The approach shown here uses triggers and an update script to get things started.
DROP TABLE IF EXISTS addresses;
//
CREATE TABLE addresses (
        id int(11) NOT NULL AUTO_INCREMENT,
	user_id INT NOT NULL,
	address_line_1 VARCHAR(100),
      	address_line_2 VARCHAR(100),
	PRIMARY KEY (id),

	FOREIGN KEY (user_id) REFERENCES users(id)
);
//
DROP TRIGGER IF EXISTS create_addresses_trigger;
//
CREATE TRIGGER create_addresses_trigger AFTER INSERT ON users FOR EACH ROW
       INSERT INTO addresses (user_id, address_line_1, address_line_2) VALUES(NEW.id, NEW.address_line_1, NEW.address_line_2);
//
DROP TRIGGER iF EXISTS update_addresses_trigger;
//
CREATE TRIGGER update_addresses_trigger AFTER UPDATE ON users FOR EACH ROW
BEGIN
       UPDATE addresses SET address_line_1 = NEW.address_line_1, address_line_2 = NEW.address_line_2 WHERE user_id = NEW.id;

       INSERT INTO addresses (user_id, address_line_1, address_line_2)
       SELECT u.id, u.address_line_1, u.address_line_2
       FROM user u
       LEFT JOIN addresses ua ON ua.user_id = u.id
       WHERE ua.user_id IS NULL;
END
//

CREATE TRIGGER user_delete_addresses_trigger BEFORE DELETE ON users FOR EACH ROW
       DELETE FROM addresses WHERE user_id = OLD.id;
//
INSERT INTO addresses (user_id, address_line_1, address_line_2)
       SELECT u.id, u.address_line_1, u.address_line_2
       FROM users u
       LEFT JOIN addresses ua ON ua.user_id = u.id
       WHERE ua.user_id IS NULL
;
Now we can start version 2
ruby server/v2/server.rb -p 8002
The server is now up and running and available at http://localhost:8002 for testing and warm-up
Now we can reconfigure the load balancer
haproxy -f cfg/v2/haproxy.cfg -p $(<haproxy-private.pid) -st $(<haproxy-private.pid)
HAProxy completes transactions to server 1 but new requests go to server version 2. When there is no traffic to Server version 1 that server can be shut down and the old database columns in the user table finally removed.
ALTER TABLE users
      DROP COLUMN address_line_1,
      DROP COLUMN address_line_2
;
Summary
Achieving a zero down-time upgrade is definitely achievable but with everything there is a cost. The steps outlined in this article still assumed a level of manual intervention running each script in sequence and following checks that the previous operation was successful. A next step would be to integrate some production level post deployment automated smoke tests to fully automate the process. Only then can it become part of an automated delivery pipeline.
Useful articles